top of page

Discover Insights in D&D Doors Garage Blog

Discover the ultimate resource for all things garage doors with our comprehensive garage blog. Whether you're seeking insights into garage safety, maintenance, or design trends, our expert articles provide the knowledge you need. Dive into our garage blog today to enhance your home's functionality and curb appeal with D&D Door Service.​

​

If your garage door is noisy, slow to respond, or just feels outdated, you don't always need a full replacement. A lot of the most common complaints — squeaky doors, dead remotes, no smartphone control, drafty gaps — can be fixed with the right product for $20 to $250.


Below is our 2027 list, based on what we actually see working (and failing) on service calls across Frederick County.


Quick Answer

The best all-around upgrade for most homeowners is a Wi-Fi belt-drive opener (Chamberlain myQ or Genie SilentMax Connect) paired with a universal keypad and a bottom seal kit. That combination solves the three most common complaints we hear: no remote access, lost remotes, and drafts/pests getting into the garage.


9 Best Garage Door Products on Amazon in 2026 (Reviewed by Frederick, MD Pros)

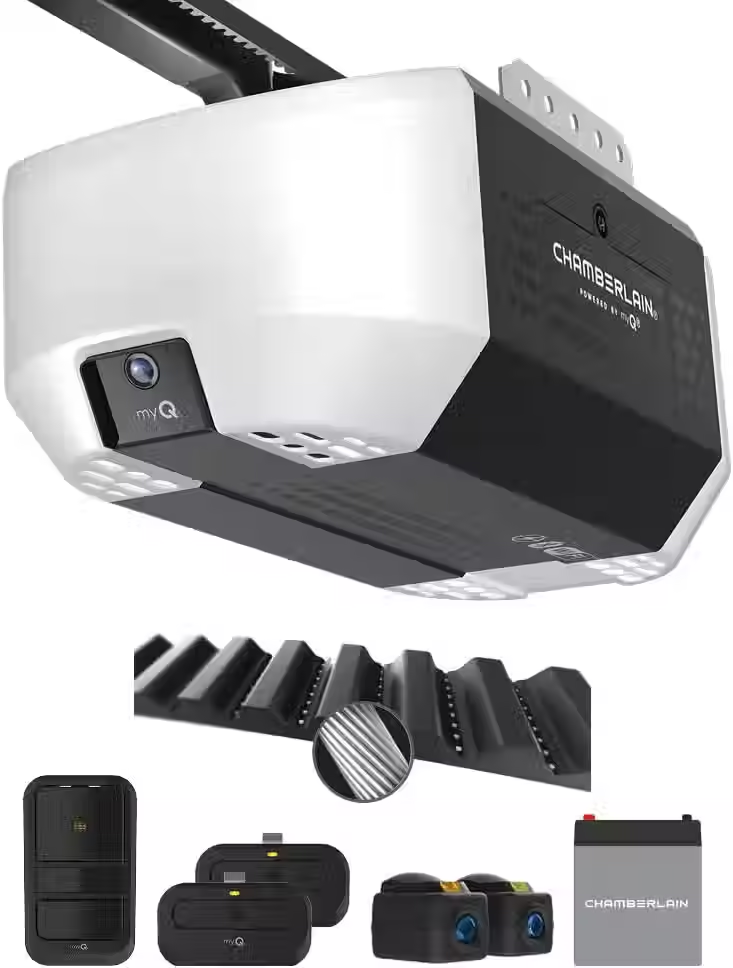
1. Best Overall Opener — Chamberlain myQ Belt Drive (1/2 HP)

Quiet belt-drive motor, smartphone app control, battery backup so it still opens during a power outage, and included safety sensors. This is the opener we recommend most often for homes with a bedroom above or next to the garage.


Good for: Homeowners who want app control without paying for a premium camera model.


Chamberlain Belt Drive myQ Garage Door Opener, 12 HP wBattery Backup

2. Best Ultra-Quiet Opener — Genie Stealth 500 Belt Drive

Consistently one of the quietest belt-drive units on the market, with LED lighting built into the unit and a pre-programmed remote so setup takes minutes, not hours.


Good for: Light sleepers, homes with attached living space over the garage.


Genie Stealth 500 Ultra-Quiet Belt Drive Garage Door Opener, Model 2055-LO

3. Best Smart Opener With Camera — Chamberlain myQ 3/4 HP with Fixed Camera

Same reliable myQ platform, but with a built-in camera so you can actually see who opened your garage and when — useful for package deliveries and teen drivers.


Good for: Package-heavy households, remote monitoring.


Chamberlain Belt Drive myQ Garage Door Opener, 34HP wFixed Camera

4. Best Heavy-Duty Opener — Genie SilentMax 1250 Connect

A 140V DC motor gives this one more lifting power for heavier insulated or double doors, plus motion-sensor lighting and Aladdin Connect Wi-Fi.


Genie SilentMax 1250 Connect Smart Garage Door Opener, Model 4142-TC

Good for: Double-wide garages, insulated or wood doors.


5. Best Universal Keypad — Briidea / Multi-Function Wall Keypad

Replaces lost or broken factory keypads and works across most Chamberlain, LiftMaster, and Craftsman models. This is the single most-requested repair we get calls for, and it's usually a $20 fix, not a $300 one.


Multi-Function Wall Keypad Control Panel, Wall-Mounted Multi-Function Garage Door Console for LiftMaster 41A5273-1 78LM, 78LMC, 41C494

Good for: Anyone with a cracked, unresponsive, or missing exterior keypad.


6. Best Replacement Remote — Universal 2-Pack Compatible with Chamberlain/LiftMaster

If you're replacing lost clickers instead of the whole system, a compatible 2-pack remote is the cheapest fix — just confirm your model number first.


2 for LiftMaster Chamberlain Craftsman Garage Door Opener Remote

Good for: Multi-driver households, lost or cracked remotes.


7. Best Safety Sensor Kit — 41A5034-Compatible Safety Sensor Kit

If your door reverses randomly or won't close at all, misaligned or failing photo-eye sensors are the most common cause. This kit is a direct swap for openers made after 1997.


41A5034 Safety Sensor Kit, Replacement for Craftsman/Chamberlain/Liftmaster Garage Door Sensor, Compatible with Liftmaster/Chamberlain/Craftsman Garage Door openers Made After 1997

Good for: Doors that won't close, reverse for no reason, or blink an error code.


8. Best Weatherproofing — Universal Threshold Seal Strip Kit (20 ft)

Cuts down on drafts, dust, leaves, and rodents getting under the door. It's a 30-minute DIY job that noticeably improves comfort if your garage connects to living space.


Jin&Bao Universal Garage Door Threshold Seal Strip 20FT Kit, Bottom Waterproof Rubber Weather Stripping Replacement(Green, 2 Adhesive)

Good for: Energy savings, keeping pests and water out.


9. Best Maintenance Product — Lithium Grease for Garage Door Hardware

The #1 reason doors get noisy is dry rollers, hinges, and tracks — not a failing opener. A single tube of the right lubricant, applied twice a year, prevents most of the squeaking we get service calls for.


Good for: Preventing noise complaints and extending hardware life.


AstraVox White Lithium Grease, Multi-Purpose Lubricant Lithium Grease

Comparison at a Glance

Product

Best For

Approx. Price

DIY Install?

Overall smart upgrade

$180–$230

Yes (2–4 hrs)

Ultra-quiet operation

$150–$200

Yes (2–4 hrs)

Package/security monitoring

$250–$300

Yes (2–4 hrs)

Heavy/insulated doors

$220–$280

Yes (2–4 hrs)

Lost/broken keypad

$18–$30

Yes (15 min)

Lost remotes

$15–$25

Yes (5 min)

Door won't close/reverses

$20–$35

Yes (30 min)

Drafts, pests, water

$25–$40

Yes (30 min)

Noise, squeaking

$8–$15

Yes (10 min)

When to DIY vs. Call a Pro

Everything above is genuinely DIY-friendly for a homeowner comfortable with a screwdriver and a ladder. Where we'd stop you:


  • Torsion spring adjustments — these are under extreme tension and cause serious injuries every year.

  • Opener force/limit settings after installing a new unit — set wrong, the door can fail to reverse on an obstruction.

  • Anything involving the cables or drums — same tension risk as springs.


If your fix involves any of those three, contact D&D Garage Doors for a same-week appointment in Frederick County — we're happy to install a unit you've already purchased.


FAQ

What is the best garage door opener to buy on Amazon in 2027? For most homeowners, a belt-drive Wi-Fi opener like the Chamberlain myQ or Genie SilentMax gives the best mix of quiet operation, app control, and price. Chain-drive units are cheaper but noticeably louder.


Can I install a garage door opener from Amazon myself? Yes — most include a DIY kit and install in 2–4 hours. Torsion spring work and force-setting adjustments are safety-critical and best handled by a licensed technician.


Do universal garage door keypads work with any opener? They work with most major brands (Chamberlain, LiftMaster, Craftsman, Genie), but always check the compatibility list against your exact model number before ordering.


How much does it cost to upgrade garage door accessories? Small fixes like keypads, remotes, or seals run $15–$40. A full opener replacement is typically $150–$300 for the unit, plus labor if installed professionally.


Updated: Jun 16

When I first thought about upgrading my garage, I realized that the flooring was the foundation of everything. A good garage floor does more than just look nice—it protects your concrete, makes cleaning easier, and can even improve safety. If you’re like me and want a garage that’s both functional and inviting, choosing the right garage flooring is key.


Why Garage Flooring Matters for Your Home


Garage floors take a beating. They endure oil spills, tire marks, dirt, and sometimes even water damage. Without proper protection, your concrete can crack, stain, and degrade over time. That’s why investing in quality garage flooring is a smart move.


Here’s what good garage flooring does for you:


  • Protects concrete from damage: Seals out moisture and chemicals.

  • Improves safety: Provides slip resistance and reduces tripping hazards.

  • Enhances appearance: Gives your garage a clean, polished look.

  • Makes cleaning easier: Smooth surfaces wipe down quickly.

  • Increases home value: A well-maintained garage appeals to buyers.


I found that even a simple upgrade like an epoxy coating made a huge difference in how my garage looked and felt.


Eye-level view of a clean garage floor with epoxy coating
Epoxy-coated garage floor with a smooth finish

Popular Garage Flooring Options and Their Benefits


Choosing the right flooring depends on your budget, how you use your garage, and your style preferences. Here are some popular options I explored:


Epoxy Coatings


Epoxy is a durable resin that bonds to concrete. It’s resistant to stains, chemicals, and wear. Plus, it comes in many colors and finishes.


  • Pros: Long-lasting, easy to clean, customizable.

  • Cons: Requires professional installation for best results, can be slippery when wet.


Interlocking Tiles


These are plastic or rubber tiles that snap together. They’re great if you want a quick, DIY-friendly solution.


  • Pros: Easy to install, comfortable underfoot, available in many styles.

  • Cons: Can trap dirt underneath if not sealed properly.


Rubber Mats


Rubber mats provide cushioning and protect the floor from heavy impacts.


  • Pros: Shock absorbent, slip-resistant, easy to replace.

  • Cons: May not cover the entire floor seamlessly.


Concrete Stain or Paint


If you want to keep the concrete look but add some color or protection, staining or painting is an option.


  • Pros: Affordable, enhances appearance.

  • Cons: Less durable than epoxy, may require frequent touch-ups.


When I was deciding, I weighed how much time I wanted to spend on maintenance and how much traffic the garage would see. For me, epoxy was the best balance.


How to Prepare Your Garage Floor for Installation


Before you install any flooring, preparation is crucial. I learned that skipping this step can lead to peeling, bubbling, or uneven surfaces.


Here’s a simple checklist to get your floor ready:


  1. Clean thoroughly: Remove all dirt, grease, and oil stains. Use a degreaser if needed.

  2. Repair cracks and holes: Fill them with concrete patching compound.

  3. Etch the surface: For epoxy, etching with a mild acid solution helps the coating bond better.

  4. Dry completely: Moisture can ruin the adhesion, so let the floor dry for at least 24 hours.

  5. Ventilate the area: Good airflow helps with curing and reduces fumes.


Taking these steps ensures your new garage flooring lasts longer and looks great.


Close-up view of a garage floor being cleaned and prepped for epoxy coating
Garage floor preparation with cleaning and patching

Maintenance Tips to Keep Your Garage Floor Looking New


Once your garage floor is installed, keeping it in top shape is easier than you might think. I follow these simple tips to maintain mine:


  • Sweep regularly: Dirt and grit can scratch the surface.

  • Clean spills immediately: Use mild soap and water for most stains.

  • Avoid harsh chemicals: They can damage coatings.

  • Use floor mats: Place mats under vehicles or work areas to catch drips.

  • Inspect periodically: Look for chips or cracks and repair them quickly.


By staying on top of maintenance, you’ll protect your investment and enjoy a clean garage for years.


Choosing the Right Garage Flooring for Your Needs


When I was ready to pick my garage flooring, I thought about how I use the space. Do you park cars, work on projects, or use it for storage? Your answer will guide your choice.


  • If you want durability and a sleek look, epoxy is a top pick.

  • For comfort and easy installation, interlocking tiles work well.

  • If you need shock absorption, rubber mats are ideal.

  • For a budget-friendly refresh, concrete stain or paint can do the trick.


Remember, the right flooring can also complement your garage door and overall home style. If you want to explore options or need professional advice, consider reaching out to local experts who understand the specific needs of homes in Frederick, MD.


The Importance of Professional Installation


While some homeowners may consider DIY options, I believe that professional installation can make a significant difference. Experts have the experience and tools to ensure the job is done correctly. They can also provide valuable insights on the best materials for your specific needs.


Professional installers can help avoid common pitfalls, such as improper surface preparation or incorrect application techniques. This can save you time and money in the long run.


Upgrading Your Garage: A Smart Investment


Upgrading your garage flooring is a smart way to protect your home and create a space you’ll enjoy. Whether you choose epoxy, tiles, or mats, the key is proper preparation and maintenance. Take your time, plan carefully, and you’ll have a garage that’s both practical and inviting.


If you want to learn more about garage door services or flooring options, check out D&D Garage Doors Service for trusted local expertise. They’re committed to helping homeowners get the best garage solutions in Frederick, MD.


Your garage deserves the best foundation—start with the right flooring today!

When it comes to keeping your garage comfortable and energy-efficient, weather stripping plays a crucial role. I’ve learned that mastering weather stripping for garage doors is one of the simplest and most effective ways to protect your garage from drafts, moisture, and pests. Plus, it helps maintain a stable temperature inside, which can save you money on heating and cooling.


In this post, I’ll walk you through everything you need to know about garage door insulation techniques, focusing on weather stripping. I’ll share practical tips, step-by-step instructions, and advice to help you get the job done right. Whether you’re tackling this for the first time or looking to improve your current setup, this guide is for you.


Why Garage Door Insulation Techniques Matter


Garage doors are often overlooked when it comes to home insulation. But they are a major source of heat loss and air leaks. If your garage door isn’t sealed properly, cold air can sneak in during winter, and hot air can invade in summer. This makes your garage uncomfortable and can affect the temperature in adjacent rooms.


Good garage door insulation techniques help:


  • Reduce energy bills by keeping your garage temperature stable.

  • Protect stored items from extreme temperatures and moisture.

  • Keep pests out by sealing gaps where insects and rodents can enter.

  • Improve comfort if you use your garage as a workspace or gym.


Weather stripping is a key part of these techniques. It seals the edges of your garage door, blocking drafts and moisture. It’s affordable, easy to install, and highly effective.


Close-up view of garage door bottom weather stripping installed
Garage door bottom weather stripping installation

Choosing the Right Weather Stripping for Your Garage Door


Not all weather stripping is created equal. Choosing the right type depends on your garage door style, climate, and budget. Here are the most common types:


  • Rubber or Vinyl Strips: These are flexible and durable. They work well on the bottom of the door to seal against the floor.

  • Foam Tape: Easy to apply on the sides and top of the door. It compresses to fill small gaps.

  • Brush Strips: These have bristles that block dust and small debris. They’re great for uneven surfaces.

  • Bulb or Tubular Seals: These provide a thick, airtight seal and are often used on the sides and top.


When selecting weather stripping, look for materials that can withstand outdoor conditions. UV resistance and water resistance are important to ensure longevity.


Tip: Measure the gaps around your garage door before buying weather stripping. This helps you pick the right size and type.


How do I seal gaps around my garage door?


Sealing gaps around your garage door is easier than you might think. Here’s a simple process I follow:


  1. Inspect the Door: Check all edges of your garage door for visible gaps or cracks. Don’t forget the bottom, sides, and top.

  2. Clean the Surface: Use a cloth and mild cleaner to remove dirt and debris where you’ll apply the weather stripping. This ensures good adhesion.

  3. Measure the Gaps: Use a tape measure to find the width and length of the gaps.

  4. Cut Weather Stripping to Size: Cut your chosen weather stripping material to fit each side.

  5. Apply the Weather Stripping: Peel off the backing (if adhesive) or use nails/screws for more durable options. Press firmly to secure.

  6. Test the Seal: Close the garage door and check for drafts or light coming through. Adjust if necessary.


For the bottom seal, you might need a special garage door threshold or a reinforced rubber strip. These provide a tight seal against uneven floors.


If you want a detailed guide, consider professional garage door weather stripping installation services to ensure a perfect fit.


Eye-level view of garage door side weather stripping being installed
Garage door side weather stripping installation

Maintaining Your Weather Stripping for Long-Term Performance


Installing weather stripping is just the first step. To keep it working well, regular maintenance is key. Here’s what I recommend:


  • Inspect Seasonally: Check your weather stripping at least twice a year, especially before winter and summer.

  • Clean Gently: Use a damp cloth to wipe away dirt and dust. Avoid harsh chemicals that can degrade the material.

  • Replace When Needed: Weather stripping can crack, shrink, or lose adhesion over time. Replace any damaged sections promptly.

  • Lubricate Moving Parts: If your weather stripping includes rubber seals, apply a silicone-based lubricant to keep them flexible.

  • Check Door Alignment: A misaligned garage door can damage weather stripping. Make sure your door closes evenly.


By staying on top of maintenance, you’ll extend the life of your weather stripping and keep your garage well insulated.


Additional Garage Door Insulation Techniques to Consider


Weather stripping is essential, but it’s not the only way to improve your garage door insulation. Here are some other techniques I’ve found helpful:


  • Insulated Garage Door Panels: If your door is old or thin, consider upgrading to insulated panels. These provide better thermal resistance.

  • Garage Door Bottom Seal Replacement: Over time, the bottom seal wears out. Replacing it with a high-quality seal can make a big difference.

  • Add a Garage Door Threshold: A threshold strip on the floor creates a tighter seal with the door bottom.

  • Use Reflective Foil Insulation: Attaching reflective foil insulation inside the door can reduce heat transfer.

  • Install a Garage Door Insulation Kit: These kits include foam boards or reflective materials designed to fit your door.


Combining these methods with weather stripping creates a comprehensive insulation system. This keeps your garage comfortable year-round and protects your investment.


Taking the Next Step for Your Garage Door


Mastering weather stripping for garage doors is a smart move for any homeowner. It’s a simple upgrade that pays off in comfort, energy savings, and protection. If you’re ready to improve your garage’s insulation, start by inspecting your door and choosing the right weather stripping.


Remember, if you want expert help, professional garage door weather stripping installation ensures the job is done quickly and correctly. This gives you peace of mind and a garage that stands up to Frederick, MD’s weather.


By investing a little time and effort, you’ll enjoy a quieter, cleaner, and more energy-efficient garage. It’s a small change that makes a big difference.

Resources + Expert Guidance + Customer Support

​The professionals at D&D Door Service, in Frederick, MD, schedule a service appointment with the customer in mind. Our technician will arrive in a fully stocked - uniformed truck. This guarantees that at every appointment the necessary tools are readily available so your time isn't wasted waiting for parts, or arranging additional service appointments.


​We service all of Frederick, Maryland and surrounding areas.


For more information or to schedule a service visit, give us a call!

bottom of page